Trouble Shooting – Carburetor Failure of the engine to operate is rarely caused by carburetor defects. If it is determined that the carburetor is responsible (that is, the ignition system is working properly and fuel is reaching the carburetor), the carburetor may be clogged or the float level may be improper. The only adjustments the second and third echelons can make on the carburetor are adjustments of the idling speed, the idling mixture, the choke control mechanism, and the accelator pump seasonal adjustment. Improver adjustment should not prevent engine operation, but proper adjustment is necessary for maximum operating efficiency. Connections Look for leaks at the fuel-line connections. If any leakage cannot be stopped by drawing up the union nut, there maybe a split tube or a poor seat in the union. A damaged flare should be cut off and a new flare made with a flaring tool. Packing with a string may serve as a temporary repair. If the fuel contains a dye, a fuel leak may be indicated by an accumulation of the dye. But it should be remembered that he porous metal used for some castings sometimes permits a small amount of seepage, and an accumulation of dye may be due to this rather than a fuel leak. Leakage may be caused by a split adapter, in which case temporary repair can be made by soldering (Editor’s Note: Use caution when attempting to solder anything used in the fuel system. The parts should be cleaned of all fuel residue before attempting to solder. If you do not already know how to solder, just procure new parts!) Fuel Bowl Fuel seeping out around the fuel-bowl cover indicates a loose cover, a damaged gasket or casting, or a defective float valve. Slight seepage is probably due to a loose cover. Extensive seepage is likely to be caused by a defective float valve. (Editor’s Note: The “defective float valve” could simply be the result of contaminated fuel – dirt/rust, etc.)
- Remove the fuel-bowl cover to examine the float. If the float contains fuel, causing it to lose bouyancy, determine where the fuel entered the float and drill a small hole (1/8 in.) at this point. Drain the fuel from the float, and patch the hole with a light drop of solder. (Editor’s Note: See comment above about soldering. Today it practical just to obtain a new float in a carb rebuild kit.)
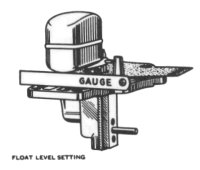
- If the float needle valve and seat show indications of wear, replace them with new parts and new gaskets. From the specifications of the carburetor, adjust the carburetor, determine the correct float level, and set the float by bending the float support arm. Hold the float in the closed position and blow into the fuel-line adapter. No air should pass through the valve. (Editor’s Note: For MB/GPWs set the float with a gage or 3/8 in.)
- Examine the gasket. Replace it if there are any breaks or hardened sections. Be sure the new gasket does not obstruct any apertures in the housings. Draw down the cover screws evenly.