Sweat and blood are the chief ingredients of the paints that graduate from the little testing lab at Holabird.
Paints are knifed, scratched, drowned, bruised, disemboweled and bent in the testing. Next thing you know they’ll be fried like an egg.
But one thing you must remember: all paints undergoing tests are applied to surfaces the ‘Army way,’ and these paints will stand up best, under conditions represented by the tests, only if they are applied the good, old Army way. Don’t put ’em on dogpatch style!
Today’s lesson deals with applying new paint over old paint in good condition and bad. Both spraying and brushing are considered.
Use Light Duty Cleaner to prepare the chassis and under-frame for painting. Dissolve an ounce or two of the cleaner in a gallon of water and spray it on hot with a steam gun. If you don’t have a steam gun, mix one quart of Degreasing Solvent with five quarts of kerosene and spray it on. Let it stand for thirty minutes — then flush it off with water.
Don’t use the Light Duty Cleaner or the Degreasing solution on the body paint. Sponge the body paint with soap and water. Use regular Army issue soap with cold water. Sponge the vehicle body with sidewise strokes, moving upward from the bottom of the vehicle, to avoid streaking. After washing, rinse oft all soapy water with plenty of clean, cold water.
Now rest ‘yore’ weary bones until the vehicle is thoroughly dry.
Your next step will be to get rid of the rust and loose paint that are clinging to the old paint Job. Massage oft the rest with a stiff wire brush and sand off the cracked, loose and blistered paint ’til the bare, metal hide of the truck is exposed. With an old brush or a rag, carefully apply Metal Conditioner (2 parts water to 1 part Conditioner) to the bare metal and the rusty spots. Leave it on for two minutes then slosh It off with water.
The Metal Conditioner-water solution removes rust and produces a ‘tooth’ or surface to which paint will cling like a bunch of barnacles.
Try not to get the solution on the painted surface. And don’t get it on your hands — use rubber gloves. If you do get it on your skin, apply baking soda, then douse with water.
Now sand the entire vehicle lightly with number 240 wet or dry paper and wash it down with mineral spirits (or a mixture of 2 parts of gasoline to 1 part of Synthetic Thinner).
You’re about ready to start painting so mask the parts of the vehicle which are not to be painted, and ‘blow’ the entire vehicle with air to remove dust particles.
Apply one thin spray coat of Primer Ground over the old paint coat. Thin the Primer Ground in the ratio of seven pints of Primer Ground to one pint of Thinner for every gallon needed.
Let this coat of Primer air-dry for about 16 hours. Sanding or surfacing is not required after the Primer Ground coat is applied. About a gallon is required to prime a four ton truck.
Remember that the above procedure applies to repainting over old paint in fairly good condition. Now, let us see about….
OLD PAINT IN BAD CONDITION
Old paint in bad condition should be stripped off the truck ’til it’s clean as a bone if you expect any kind of decent results. For real easy going, use Alkali Paint Stripper, 6 to 10 ounces to a gallon of water. Use the solution hot.
There are two ways to rn the stripper. One way is the ‘trickle’ system by which you let the solution drip onto the vehicle from an overhead, perforated lead pipe until all the paint is soft. It you have the equipment, do it this way. If not, do it the second way: lay the hot solution on heavy with an old brush. Wear rubber gloves! Otherwise, you’ll walk away from the job with hands that’re nothing but a fistful of bones. Let the stripper act on the paint for about five minutes then hose It off with cold water. Repeat the performance on spots where the paint hasn’t come off.
After you’ve got all the paint off, remove every trace of the stripper with cold water. Be especially thorough at moldings, door jambs, etc. Any stripper that’s left on the surface will raise all kinds of cain with your paint job — like blistering, whitening or removal of the paint.
A COUPLE OF HINTS
Keep stripper away from wood. Stripper swells wood like a belly full of beans — then eats into it like an acid. Strip wood with solvent or burn or sand off the paint.
Stripper is poison on your skin — if you get any on, wash it off quickly and neutralize any remaining alkali with vinegar.
Stripper is a little too tricky to spray on — do it with a brush.
If messing around with an alkali stripper doesn’t appeal to you, use other kinds of strippers such as chlorinated solvents.
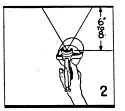
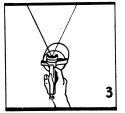
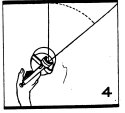
3. Spray gun should always be held at right angles to the work. Do not swing the gun in an arc.
Now the entire metal surface is ready to be treated with Metal Conditioner (diluted two parts of water to one of Conditioner). Wait two minutes and wash off all of the Conditioner residue with cold water. The bare metal surface is now ready for primer. We’ll use a single, heavy spray coat of Rust-Inhibiting Primer. The Primer should be thinned in the ratio of seven pints of Primer to one pint of Thinner for each gallon needed. This particular Primer has been developed especially for use under luetreless olive drab enamel and should be applied somewhat more heavily than ordinary primers. A four-ton truck requires about one and one half gallons. Grease spots left on the metal under the Primer will soak throngh and give you a messy job that may need re-doing — be carefull!
Let the Primer coat air-dry for about sixteen hours. You need not surface it, sand it or use putty.
APPLYING LUSTRELESS OLIVE DRAB ENAMEL
Now we’ve prepared and primed vehicles with old paint in good and bad condition. Both types of surfaces are then painted the same way. Let’s go to work:
We’11 use Lustreless Olive Drab Enamel thinned with one pint of Thinner to seven pints of Enamel for each gallon needed to work with.
We’ll spray the paint on, using 55 pounds of pressure at the gun. On hot days, the air pressure can be reduced 10 or 15 pounds reduce — it though before you begin to paint so that the entire job gets the same pressure. If you don’t, color changes will appear. Use the gun
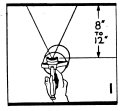
A wavy finish results when the gun is held too close to the work.
When the gun is held too far from the work, a rough pebbly surface results.
almost wide open to get a full, wet coat, and hold it no more than 18 inches away from the surface.
We’ve got to watch out for ‘dusting’, that is, the paint hitting the surface in little half-dry blobs. In very hot weather, our Thinner may be too volatile, that is, it will evaporate before the paint hits the surface and cause dusting. The addition of two ounces of clean kerosene to a gallon of Thinner before it is used to dilute the paint, will relieve this condition.
If a heavy film of paint is desired, a second full wet coat does the trick. A drying time of two hours is best between coats, but its’ worth the time and effort because two coats will give you a much better job.
The four-ton truck we have just painted, took about three gallons of enamel.
WARNING
Lustreless Olive Drab Enamel is a greater fire hazard than ordinary glossy paints. In the can it’s safer because its ingredients are less inflammable. The fire hazard rears its ugly head in the spray dust. Wherever this dust has been allowed to accumulate and build up, (as in spray booths and corners and cracks of the paint shop) the danger of fire lurks.
The accumulated layers of the dried enamel possess a porous, honeycomb structure. Oxygen from the air easily penetrates, combines with the drying oils in the spray dust and before anyone knows it, flares up in spontaneous combustion.
A number of fires of this kind have already been reported.
The only way to prevent this from happening to you, is to keep your paint shop clean. Scrape all the spray off walls, out of spray booths, corners and any place else where it might accumulate.
And before you throw away these spray dust scrapings, wet them down well with water!
BRUSH APPLICATION OF LUSTRELESS ENAMEL
For shops which are not yet equipped with spray apparatus, a note on the brush application of lustreless enamel is in order.
First clean the vehicle and prepare it for paint the same as for spray application. For brushing, Primer Ground or Rust-Inhibiting Primer, is used just as it comes in the can — or thinned no more than 5% (one-to-twenty). Brush on as thin a coat as possible. If the primer dries too quickly, a ‘slower’ thinner is needed. Two ounces of clean kerosene added to a gallon of thinner will slow it up.
You’ll need about three quarts of Primer for a four-ton truck. Let the Primer coat air-dry for about 16 hours.
For brushing, thin the lustreless olive drab enamel the same way you did the primer. In laying the paint on, ‘flow’ it on and pass the brush through the paint as little as possible. Apply a medium heavy coat. One coat is satisfactory but two coats make a tougher and more lasting surface. Allow 16 hours drying time between coats.
Two gallons of enamel should do for a four-ton truck.
Remember, It is impossible to apply lustreless enamel by brush without leaving brush marks in the finished work. Streaking and flooding also occur. All things considered, a spray job is much superior to a brush job when working with lustreless enamel.
STENCILING
When the enamel is dry enough to stand taping (usually after about four hours) do your stenciling with Lustreless Blue Drab Enamel. Gummed edge stencils should be used to produce sharp edges and make the job easier. But trouble often occurs because the stencil gum sticks to the paint and causes dark smudges. Perhaps the best way is to apply the gum to the back of the stencil, rather than to the paint job. The gum should be almost dry before it is placed against the paint.
Spray on a solid, heavy coat of the enamel and when it has dried for ten minutes, remove the paper stencils.
(Editor’s Note: As a modern work-around try using Rick Larsens‘ Stencils.)
If gum smudges remain, wipe them off lightly with gasoline after the enamel has dried for two hours. Be careful not to get gasoline on the numerals or designs themselves.
Now, remove the masking tape, clean the windows and tires, and give the job a final inspection. Except for another sixteen hours drying time which the vehicle should have if possible, your job is done. There may be some old-timers in the audience who as they read this, remember a few tricks they have up their sleeves about painting. But as far as painting with the new lustreless enamel goes, that’s where they ought to leave their tricks — up their sleeves. For the paints which have been selected by the Army will do the job best only when the above procedure is followed.
SPECIFICATIONS:
Light Duty Cleaner – QMC tent. Spec. ES-542
Degreasing Solvent – QMC tent. Spec. ES-398a
Metal Conditioner – QMC tent. Spec. ES-431a
Synthetic Thinner – Specification ES-370b
Primer, Ground – QMC tent. Spec. ES-360a
Lustreless Olive Drab Enamel – QMC tent. Spec. ES- 474c
Lustreless Blue Drab Enamel – QMC tent. Spec. ES-5lOb, Type A
Paint Stripper Alkali – QMC tent. Spec. ES-452a
Primer, Rust-Inhibiting. Spec. ES-359b
What about today? Today your BEST BET is to go with one of two paint systems. Either TM9 Ordnance Paint or Paolo’s Paint as sold by Pete Debella. IF you use the TM 9 paint make sure that either the flat white or the blue drab paint you want to use will work.
Disclaimer: If you don’t know paint from shinola (like me) then this might be of interest to you. Of course, bear in mind that chemicals and approved use of chemicals have changed over the last 60 years so if you plan on using this information do so with a grain of salt and much caution. I guess just like we don’t use carbon tet in fire extinguishers any more…