There is a wealth of information available in the original WW2 Army Motors published by the Technical Service Division, Holabird Quartermaster Motor Base, Baltimore, MD
From Army Motors, August 1942.
 Tips from Army Motors
There is a wealth of information available in the original WW2 Army Motors published by the Technical Service Division, Holabird Quartermaster Motor Base, Baltimore, MD
From Army Motors, August 1942.
We always like to sit in a, soft chair and tell people how easy it is to change a tire. Because for our money – there isn’t any easy way to change a tire. But there are ways of changing one that makes it easier, and is easier on the tire and tube.
While strolling through, the shop with our concealed camera lens peeping out through a cross in our shoe strings, we picked up the accompanying picture sequence with some comments both educational and profane that may help you save rubber and skinned knuckle’s.
As we see it, some trusting souls with a limited knowledge–of life and split rims, expect things to happen this way:
After removing the valve core to make sure that a11 the air is out of the tube, and then taking off the rim nuts, they stand back quietly, expecting the split-type rim to crumble away from the tire with no more activity on their part, part, than a close inspection of their nail polish.
But it does not happen that way. Any tendency of the wheel to dissolve away from the tiremust be aided and abetted by a few persuasive blows of the hammer and a few sweeps of the spoon iron.
Furthermore, there is a popular misconception that the close affinity between tire and rim, is due to the halves of the split rim having got stuck together. And any amount of preying, pounding and imprecation has been showered on the innocent rim without result.
One little group we know of, attacked a tire and rim unsuccessfully for three hours, inflicting considerable damage to the beads and their tempers, and finally, in sheer desperation, drove a 2 1/2 ton truck over the sidewalls in an attempt to dislodge the tire from the rim – with, we might a d d, further unsuccess.
The truth of the matter is twofold: First, there’s the beadlock supporting the tire from the inside. Second, the bead does stick tenaciously to the rim.
The proper approach is scientific and deliberate.
The spoon iron must be driven between the bead and rim and worked around to completely loosen the bead. The reward at, the end of the few short minutes it requires to loosen the bead, is the rim seperating as effortlessly as an egg dropping out of a halved shell.
As our pictures prove, there’s nothing more to it, than that.
A few words of caution though: Tubes that have been in service long enough to have become stretched, wrinkle when returned to the tire, and are sure to give trouble in time — replace them.
When reassembly of the rim has begun, it’s a good idea to round out the tube with a little air — this helps hold the valve in place, and keeps the tube from getting pinched.
Well, it’s been easy changing a tire with our big, fat mouth –we’re sure you won’t find it so easy with your hands. But that’s all right — you like hard work.
Tips from Army Motors
There is a wealth of information available in the original WW2 Army Motors published by the Technical Service Division, Holabird Quartermaster Motor Base, Baltimore, MD
From Army Motors, August 1942.
We always like to sit in a, soft chair and tell people how easy it is to change a tire. Because for our money – there isn’t any easy way to change a tire. But there are ways of changing one that makes it easier, and is easier on the tire and tube.
While strolling through, the shop with our concealed camera lens peeping out through a cross in our shoe strings, we picked up the accompanying picture sequence with some comments both educational and profane that may help you save rubber and skinned knuckle’s.
As we see it, some trusting souls with a limited knowledge–of life and split rims, expect things to happen this way:
After removing the valve core to make sure that a11 the air is out of the tube, and then taking off the rim nuts, they stand back quietly, expecting the split-type rim to crumble away from the tire with no more activity on their part, part, than a close inspection of their nail polish.
But it does not happen that way. Any tendency of the wheel to dissolve away from the tiremust be aided and abetted by a few persuasive blows of the hammer and a few sweeps of the spoon iron.
Furthermore, there is a popular misconception that the close affinity between tire and rim, is due to the halves of the split rim having got stuck together. And any amount of preying, pounding and imprecation has been showered on the innocent rim without result.
One little group we know of, attacked a tire and rim unsuccessfully for three hours, inflicting considerable damage to the beads and their tempers, and finally, in sheer desperation, drove a 2 1/2 ton truck over the sidewalls in an attempt to dislodge the tire from the rim – with, we might a d d, further unsuccess.
The truth of the matter is twofold: First, there’s the beadlock supporting the tire from the inside. Second, the bead does stick tenaciously to the rim.
The proper approach is scientific and deliberate.
The spoon iron must be driven between the bead and rim and worked around to completely loosen the bead. The reward at, the end of the few short minutes it requires to loosen the bead, is the rim seperating as effortlessly as an egg dropping out of a halved shell.
As our pictures prove, there’s nothing more to it, than that.
A few words of caution though: Tubes that have been in service long enough to have become stretched, wrinkle when returned to the tire, and are sure to give trouble in time — replace them.
When reassembly of the rim has begun, it’s a good idea to round out the tube with a little air — this helps hold the valve in place, and keeps the tube from getting pinched.
Well, it’s been easy changing a tire with our big, fat mouth –we’re sure you won’t find it so easy with your hands. But that’s all right — you like hard work.
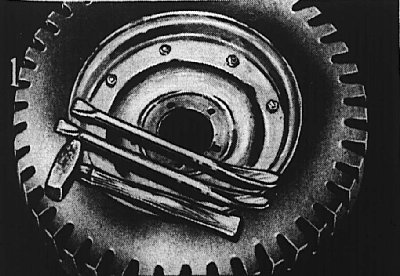 With two spoon irons and a hammer,you can remove combat tires from now until Johnny comes marching home. Don’t go wild – use ’em with tact and care especially with the hammer. Roll up you eyelids and let’s go.
There are plates riveted on both sides of the rim, saying, “Warning – Deflate tires before removing rim nuts.”
A couple of dead guys we knew, named “Exhibit-A” and “Exhibit-B,” could tell you why
With two spoon irons and a hammer,you can remove combat tires from now until Johnny comes marching home. Don’t go wild – use ’em with tact and care especially with the hammer. Roll up you eyelids and let’s go.
There are plates riveted on both sides of the rim, saying, “Warning – Deflate tires before removing rim nuts.”
A couple of dead guys we knew, named “Exhibit-A” and “Exhibit-B,” could tell you why Remove rim nuts. Remember all the air in the tire is straining against the half of the rim which is held down only by the nuts. Deflate before removing nuts – or you’re a dead dogface.
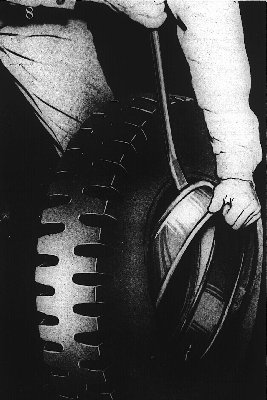
 Hold the iron flat and hammer it inward so it follows the rim and doesn’t bite the bead.
Walk it around, working the bead loose from the rim — carefully.
Hold the iron flat and hammer it inward so it follows the rim and doesn’t bite the bead.
Walk it around, working the bead loose from the rim — carefully.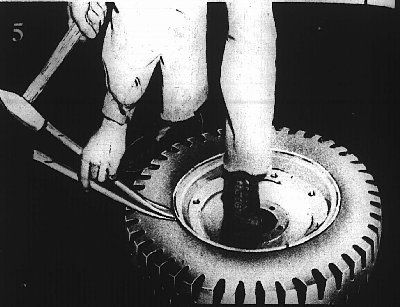 Here’s a little trick called “stacking up the irons,” which will give you a bigger bite and more leverage in getting the bead away from the rim. (Remember you already gone once around the rim.)
 The inner half of the rim is as loose as grandma’s upper plate. Just lift it gently out of the tire. You can do the same with the lower half of the rim with even less effort.
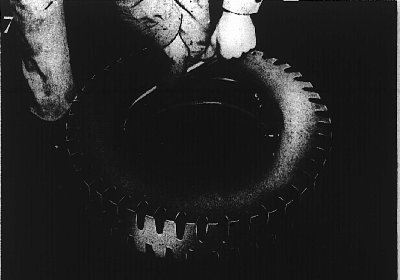 Remove the beadlock. Pry it out with the iron. Don’t pinch the tube! Pinched tubes cause more blowouts than nails. (For proof, send $10 in gold to cover mailing costs.)
 Be masterful. Force the beadlock outward on the side opposite the valve. Forcing it out on the valve side will uproot the valve quicker than you can say “G!Zfi*?XA%A.”
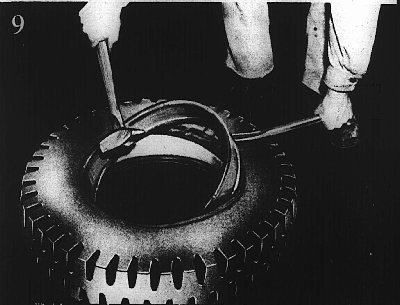 While prying upward on the beadlock, rap the bead squarely whereever it binds. In this way, you will knock the bead over the flange of the beadlock. The bead is delicate — don’t bruise it.
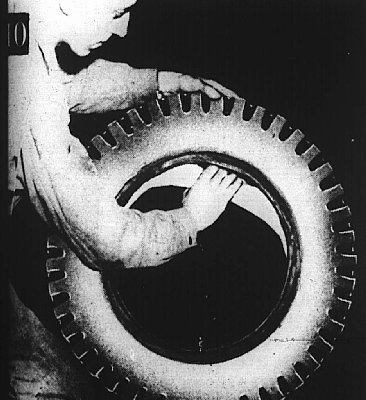 Grasp tube (not valve stem) to remove tube. Find nail that cause blowout and remove to prevent snagging and further tearing of the tube.
There now, wasn’t that easy? (No). Now put the tire on a spreader or run your hand around the inside and take out dirt, pebbles, etc. and examine the tire for tears and roughness. Report tire damage to the Tire Detail of your outfit. No damage? Okay, let’s put it back together again.
Grasp tube (not valve stem) to remove tube. Find nail that cause blowout and remove to prevent snagging and further tearing of the tube.
There now, wasn’t that easy? (No). Now put the tire on a spreader or run your hand around the inside and take out dirt, pebbles, etc. and examine the tire for tears and roughness. Report tire damage to the Tire Detail of your outfit. No damage? Okay, let’s put it back together again. With the repaired tube in the tire again, carefully align the valve stem with the hole in the beadlock and start it back into the tire. Remember, the beadlock is between the beads.
 When inserting the rim, make sure the beadlock and the rim line up exactly at the valve stem (it’s a little off center). You don’t want the stem disappearing when you’re finally finished.
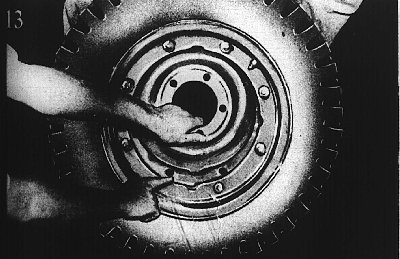 Match the lug in the back rim with the slot in the front half of the rim. This’ll save you from the bughouse trying to line things up when you go to put on the nuts (That’s the lug on the back on the back rim).
 Last step: Finger-fit all nuts, then tighten in turn ’til the rim bottoms. Pull up all the way. You’re done! You’re the master! Do the same with the other type of combat wheel — the ‘side flange.