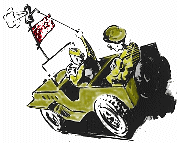
Here is an interesting mod that is appropriate for jeeps and other vehicles when providing support for a general.

 Click picture for a larger view (234kb)
One day soon, if you?re a 2nd echelon or higher unit, you may be confronted by a general officer with the request that you install a flagstaff on a vehicle that has just been assigned to him.
Being an ambitious sort, you immediately hop to the task full of verve, dash and ignorance, and construct a flagstaff replete, with eagles, gargoyles and generally resembling a totem pole.
Shortly afterwards the general, viewing your handiwork, which you have thoughtfully mounted in the radiator filler neck, takes off on a short flight of apoplexy, at the conclusion of which you find yourself designated highman on the trash wagon.
For a flagstaff, although it may sound like a little bit of nothing to you, is important enough to rate a lot of space in Army Regulations and must be built according to Hoyle. Specifically, AR 260-10, Change 5, October 14, 1942, Paragraph 2g(5)(b) and (c) says staffs for general officers will be metal…”of sufficient length so that when mounted as indicated in (c)below, the lower edge of the flag will fly about 1 inch higher than the crest nf the hood of the automobile.”
“(c) Staffs for automobile flags of general officers will normally be mounted on the right front-bumper support. Where this is not practicable the nearest suitable location which will not interfere with the right headlight beam will be used.”
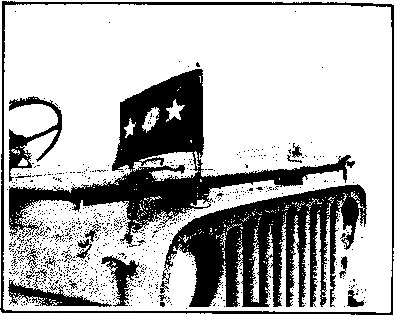
For this reason, a bulletin is being prepared on how to build and mount a flagstaff for general officers? flags.
According to the bulletin, the staff (the part where the flag is attached) can be readily made from a GMC valve push rod, Part No. 2135423, by annealing the rod where it is to be cut off and threaded (see print, Fig. 1). (To anneal the rod all you have to do is heat it to a cherry red where it is to be cut off and threaded, and allow it to cool slowly.)
Cleats, made from 3/32 steel welding rod, are then brazed onto the push rod. The flag will be attached to these cleats: The top cleat pushes through the material; a silken cord from th flag is tied around the bottom cleat.
The little push-rod flagstaff sits down in a socket. This socket (see print) can be made from a Plymouth wheel bolt, Part No. 393984, or any standard 1/2-20 bolt.
On passenger vehicles, the flagstaff is mounted on the bumper bracket. To accomplish this, a 28-inch piece of 3/8-inch iron pipe is mounted on the right bumper bracket by means of the plate shown in the print. The flagstaff socket screws into the top of the iron pipe.
Click picture for a larger view (234kb)
One day soon, if you?re a 2nd echelon or higher unit, you may be confronted by a general officer with the request that you install a flagstaff on a vehicle that has just been assigned to him.
Being an ambitious sort, you immediately hop to the task full of verve, dash and ignorance, and construct a flagstaff replete, with eagles, gargoyles and generally resembling a totem pole.
Shortly afterwards the general, viewing your handiwork, which you have thoughtfully mounted in the radiator filler neck, takes off on a short flight of apoplexy, at the conclusion of which you find yourself designated highman on the trash wagon.
For a flagstaff, although it may sound like a little bit of nothing to you, is important enough to rate a lot of space in Army Regulations and must be built according to Hoyle. Specifically, AR 260-10, Change 5, October 14, 1942, Paragraph 2g(5)(b) and (c) says staffs for general officers will be metal…”of sufficient length so that when mounted as indicated in (c)below, the lower edge of the flag will fly about 1 inch higher than the crest nf the hood of the automobile.”
“(c) Staffs for automobile flags of general officers will normally be mounted on the right front-bumper support. Where this is not practicable the nearest suitable location which will not interfere with the right headlight beam will be used.”
For this reason, a bulletin is being prepared on how to build and mount a flagstaff for general officers? flags.
According to the bulletin, the staff (the part where the flag is attached) can be readily made from a GMC valve push rod, Part No. 2135423, by annealing the rod where it is to be cut off and threaded (see print, Fig. 1). (To anneal the rod all you have to do is heat it to a cherry red where it is to be cut off and threaded, and allow it to cool slowly.)
Cleats, made from 3/32 steel welding rod, are then brazed onto the push rod. The flag will be attached to these cleats: The top cleat pushes through the material; a silken cord from th flag is tied around the bottom cleat.
The little push-rod flagstaff sits down in a socket. This socket (see print) can be made from a Plymouth wheel bolt, Part No. 393984, or any standard 1/2-20 bolt.
On passenger vehicles, the flagstaff is mounted on the bumper bracket. To accomplish this, a 28-inch piece of 3/8-inch iron pipe is mounted on the right bumper bracket by means of the plate shown in the print. The flagstaff socket screws into the top of the iron pipe.
 1/4-ton jeep with flagstaff mounted on the hood.