CHECKING CURRENT AND VOLTAGE REGULATORS
Each year new electrical unite are being added to the motor vehicle, increaeing the demand placed upon the electrical system. Delco-Remy is supplying a new current and voltage regulator (Figure 1) to take care of this increased demand. As there are apt to be quite a few military motor vehicles equipped with these new regulators, it will be of interest and profit to understand how they are checked.
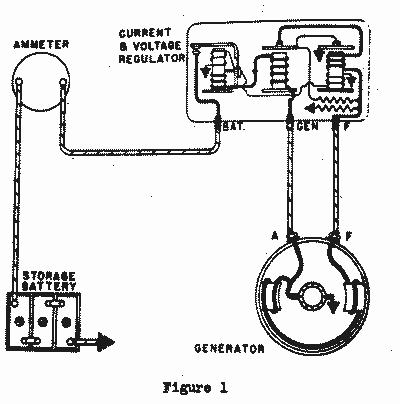
These regulators (Models 1118201 and 1118202) are precision built units, and must be adjusted accurately to the specified settings. The right instruments and gages make adjustment easy and eliminate guess work. The use of a heavy duty 3/4 ohm fixed resistance, as described later, simplifies the adjustment of the voltage regulator. Of course, the ammeter and voltmeter must be accurate because the new generators are capable of producing up to 34 amperes. It wouldn’t do the battery or the other electrical units any good to have that amount of juice running around loose.
There are three separate units in the new regulator, and each must be checked and adjusted separately. They are the cut-out relay, the current regulator unit and the voltage regulator unit.
Before making any adjustments whatever on any of these units it is imperative that the regulator contact points are clean. Dirty or oxidized points cause low’generator output and run-down batteries. The cleaning must be done with care – incorrectly cleaned points will effect only a temporary improvement and make accurate adjustment of the regulator impossible.
To clean the pointé, remove the upper contact support as shown in Figure 2. Use a clean, fine-cut contact point file, and clean each
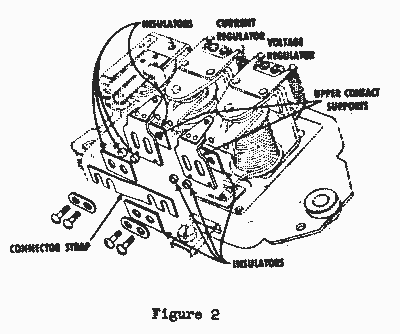
point separately. Do not use file excessively on the roun~ed (smaller) point. NEVER USE SANDPAPER OR EMERY CLOTH TO CLEAN THE POINTS. If the flat point is pitted, clean out the cavity with a “spoon” or riffler file to make a good, clean contact between the points. When reassembling the unit make sure tbat the insulators (Figure 2) are correctly located.
Cut-out Relay
To check the setting of the cut-out relay (Figure 3) connect the voltmeter from the “gen” terminal of the regulator to the regulator base. Slowly increase the generator speed until the cut-out relay closes, which should be between 6.2 and 6.7 volts. To adjust, bend up the spring post (Figure 3) to increase the spring tension and the closing voltage.
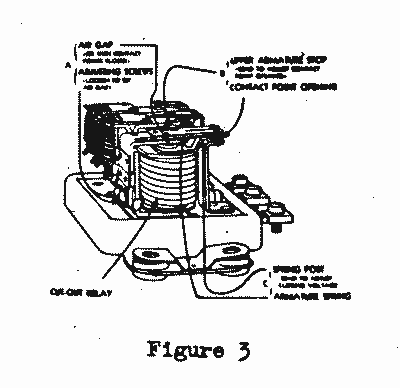
The air gap (Figure 5) should be .020 inch with the contact points closed. Check by moving the armature down until the points just close (regulator must be disconnected!) and then measuring between the winding core and the armature. If both sets of points do not close at the same instant, bend the spring fingers until they do. Adjust the air by loosening the two adjusting screws and raising or lowering the armature as required.
The contact point opening should be .020 inch. It is adjusted by bending the upper armature stop.
Before making any adjustment on the. current or voltage regulators, bring the unit to operating temperature. Failure to de this will make accurate adjustment impossible.
Current Regulator
To check the setting of the current regulatory bridge the voltage regulator points from the frame to the upper point support with a jumper lead, and. connect an ammeter into the charging circuit at the “bat” terminal, as shown in Figure 4. Since the voltage regulator is now inoperative, turn on the lights and other accessories to prevent high voltage in the system. Operate the generator at medium speeds. The current reading on the ammeter should be 34 amperes with the unit at operating temperature.

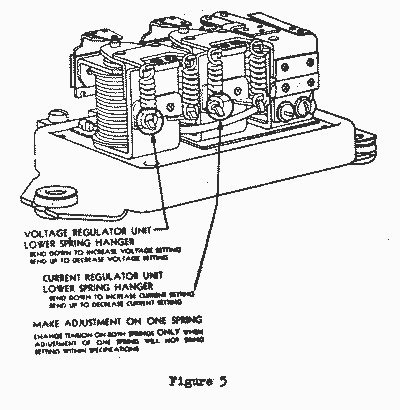
Adjust by bending the spiral spring hanger of one string on the current regulator (Figure 5) down to increase, up to lower, the current setting. Normally, sufficient range of adjustment can be made on one spring only without touching the other spring. However, when the unit is badly out of adjustment, it will be necessary to remove one spring entirely, adjust the remaining spring to 17 amperes, then reinstall the second spring and complete the readjustment to 34 amperes on this second spring. This insures that each spring will carry one-half the total tension and that the armature will be balanced.
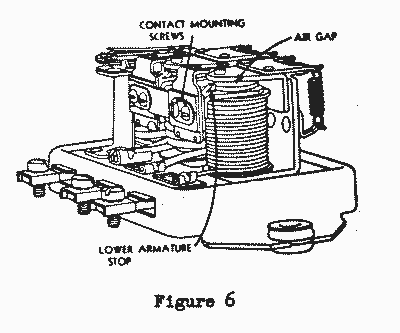
The air gap should be .080 inch. It is measured between the center of the core and the armature with the points just touching, as shown in the voltage regulator illustrated by Figure 6. A convenient way of adjusting the air gap is to insert the correct gage between the center of the winding core and the armature and hold the armature down against it. Then loosen the two contact mounting screws and move the contact mounting bracket up or down as necessary until the points just touch. Make sure the points are lined up properly, and tighten the screws well after adjustment.
Voltage Regulator
To check the setting of the voltage regulator (Figure 7); disconnect the “bat” terminal lead, and connect the voltmeter and a 3/4 ohm fixed resistance from this “bat” terminal to the regulator base. Operate the generator at medium speed and note the voltage setting, which should be between 7.2 and 7.4 volts with the unit at operating temperature.
Adjust by bending the spiral spring hanger of one spring on the voltage regulator (Figure 5) down to increase, up to decrease, the voltage setting.
It is very important, after each adjustment, to replace the regulator cover, reduce the generator speed until the cut-out relay contact points open, and then bring the generator back to medium speed before taking the v9ltage reading, which should be 7.2 to 7.4 volts. Normally, bending one spring will give sufficient range for adjustment, and the other spring will not have to be touched. However, when the unit is badly out of adjustment, a special adjustment procedure must be followed to insure that each spring will carry one-half the total tension.
- Remove one spring.
- Connect voltmeter from the “gen” terminal to the regulator base.
- Open voltage regulator points by holding the armature down and slowly increase generator speed until the voltmeter reads about 2.5 volts.
- Close regulator points by releasing the armature and adjust the setting to between 3.5 and 3.7 volts.
- Install the second spring and complete adjustment as outlined above, making the connections shown in Figure 7.
The air gap at the voltage regulator (Figure 6) should be .075 of an inch. It is adjusted in exactly the same way as that in the current regulator.

If good instruments and proper gages are used, the simple procedure outlined here will facilitate the adjustment of these new regulators.